Modify Columns and Column Fields in the Documents Window
Tasks that you can perform in the Documents window include:
- Sorting a single column
- Sorting multiple columns
- Modifying column fields
See the following sections for more information.
Sort a Single Column in the Documents Window
-
Right-click an individual column to display the right-click context menu.
-
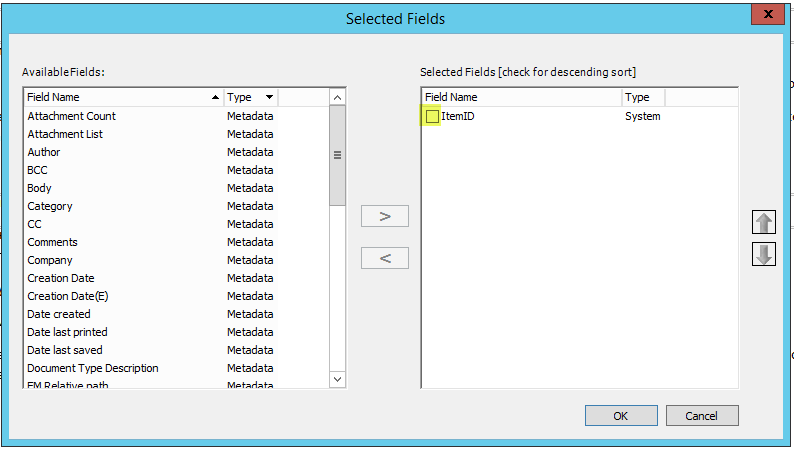
Select Sort name of field. In this example, we are sorting the Item ID field.

The Selected Fields dialog box appears.

-
Select the check box to sort the fields in Ascending order.
- Clear the check box to sort the selected field in Descending order.
-
-
Click OK.
Sort Multiple Columns in the Documents Window
You can click an individual column to sort it, but if you click another column, the previously sorted column returns to its original state. To sort two or more columns (sorts can only occur within one Session at a time) and have those columns maintain the sort (descending and/or ascending sort direction may apply for each field), follow these steps:
-
Select either a Processing Job Session tab or a Data Extract Job Session tab.
-
Right-click the Processing Job tab or Data Extract Job tab to display the context menu.

-
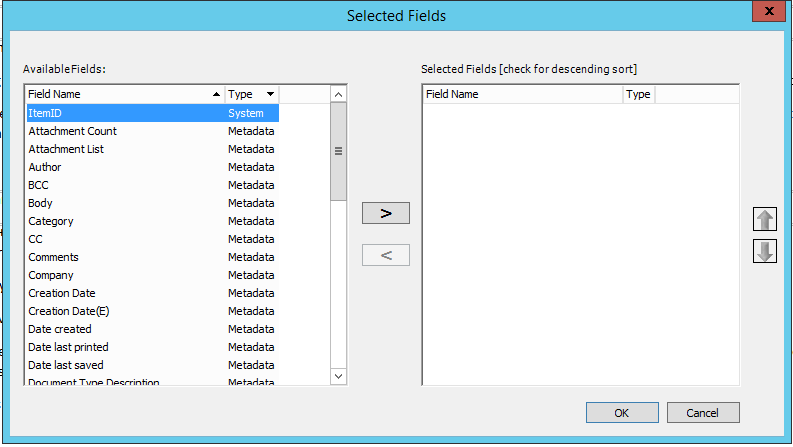
Select Sort. The Selected Fields dialog box appears.

- Double-click a field you want to move from the Available Fields list box to the Selected Fields list box.
- SHIFT-click multiple fields to select a group of contiguous group of fields. Then click
 . The fields are moved to the Selected Fields list box.
 - CTRL-click individual fields to select a group of non-contiguous fields. Then click . The fields are moved to the Selected Fields list box.
- Click
 to remove a field from the Selected Fields list box. The fields are moved back to the Available Fields list box.
-
By default, the fields are in ascending order unless selected for descending order. These fields display in the Selected Fields list box with an empty check box.
To change the default ascending sort direction to descending, select the empty check box by the field. Repeat this step for any additional fields that require descending sort order.
- To reposition a field in the Selected Fields list box, select the field and use the up and down arrows to move the selected field to a different position.
- When finished, click OK.
Modify Column Fields
The columns in the Documents List window can be customized.
To select which fields to display, do the following:
-
Select the Session in the Documents window.
-
Choose Tools > Selected Fields from the eCapture QC menu bar.
You can also right-click any field column (in the applicable Session) to display the right-context menu. Click Selected Fields.

The Selected Fields dialog box appears. The fields that display in the Selected Fields list box are the fields that are presently displayed in the Documents window.
-
Double-click the Available Fields you want to have displayed in the Documents window columns. These fields display in the Selected Fields box.
-
To sort the fields in the Selected Fields list box, use the up and down arrows. Select the field and then click the arrow to move it to the new position.
- Select the option Refresh All Sessions if you want all open sessions to reflect the changes you made in this dialog box. Otherwise, if you do not select it, only the current session will show the changes.
- Click OK.
Copy the Field Contents for a Document to the Clipboard
The contents of a field may be copied to the clipboard provided there is data in the field. The context menu will display a maximum of 25 characters found in a field. However, the contents of the field (up to 100 characters) will be copied to the clipboard.
The fields are located above the first document in the Documents List Window. If necessary, ensure that the appropriate fields are displayed.
-
Locate the document containing the data to paste to the clipboard.
-
If necessary, scroll to the right to display the field and its data.
-
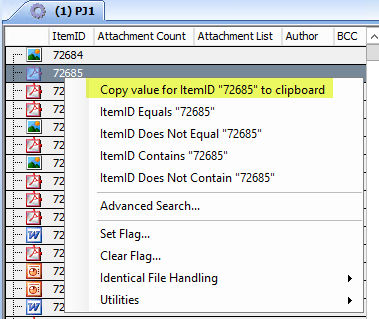
Right-click the field to display the context menu. The first option in the context menu displays: Copy value for fieldname “contents of field data up to 25 characters”. In this example, the field is the ItemID field.


Note: If the field is empty, the context menu will not display this option. The Attachment field for the selected document is empty. Therefore the Copy right-click menu option is not available.

-
Click the Copy option. The contents of field data, up to 25 characters, is copied to the clipboard.
-
Paste the data into a third-party application.

Related Topics